Coroplast & Cube cage
Introduction
What you need
What size
Building the cage
Conclusion
Introduction
More commonly called the CC cage or C & C cage, this is actually a DIY cage which was invented by someone in America. You can visit http://cavycages.com/cubes.htm for more information. Would like to thank Teresa Murphy who's also the webmaster of Cavy Cages for allowing me to borrow some photos to use here. All pics on this page except the two with my name are courtesy of Teresa.
The advantages of this cage is that its extremely flexible in the sense that you can make it as big as you want. If you have the space you can even create a cage 2 metres long! You can even make 2, 3 or even 4 storey cages. However I do not recommend this 'cos cavies are not agile creatures. Ramps & multiple stories are a bad idea even if the ramps are solid & not steep. Therefore I will only feature the single storey cage on this site 'cos I feel the double storey one is not safe.
Disadvantages would include difficulty in locating the materials needed to make the cage. The actual building process is also tiring & requires skill & patience. An improperly built C & C cage will most likely start falling apart after a few months. Bedding & pee may also leak from the bottom if its not constructed properly. The C & C cage is designed with no cover on top of the cage. You can easily use the grids to make a cover but that means you need to make a door. Not easy! If you don't want a door, then make a cover which can be opened. Also not easy!
Being a solid bottom cage means you will need to use bedding. The larger the cage the more bedding is needed. Keep that in mind 'cos bedding isn't exactly cheap. And like the plastic bottom cage, remember that your cavy may still end up sitting in pee soaked bedding.
What you need
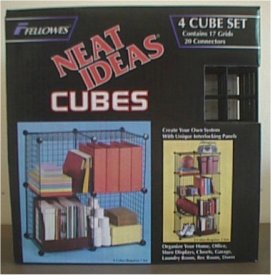
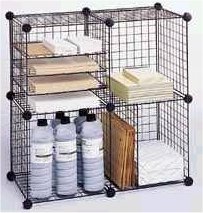
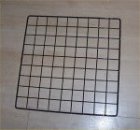
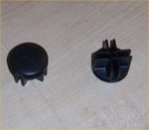
These cubes are usually built into shelves for storing items as can be seen from the pic above. Unlike the US where they are available from most places, these cubes are very rare in Singapore. Fellowe's Neat Ideas Cubes is the only type available & it is no longer sold in shops. If you want to buy it, you have to make arrangements with Fellowe's supplier "Hi-Q Marketing Pte Ltd". They're located at Tanjong Pagar Distripark #04-10 & can be reached at hiqmpl@starhub.net.sg or 6221 3811. I spoke with Eleanor who quoted me $63 (before GST) for each set of cubes which comprises of 17 grids & 20 connectors. Additional connectors will cost $2 each. Below I have pics of the grid & connectors.
Joanne informs me that another place also sells something similar to cubes. The place is Yew Lee Metalworks Pte Ltd & is located at No. 17 Tai Seng Drive, #01-01 Yew Lee Building, S'pore 9535221. They can be contacted at 6383 6868. Their's is not Fellowes but some brandless one. Don't tell them cubes 'cos they wouldn't understand. Tell them you are looking for wire mesh pigeon holes. Joanne says they are the same as Fellowe's grids except their's are rectangular unlike Fellowe's which are square. Yew Lee's comes with connectors too.
Each connector costs $0.65 & each grid costs $2.20. Prices from Joanne. So its much cheaper than Fellowes. However Fellowe's grids are standard size of 34.3 X 34.3 cm each. Yew Lee Metalwork's grids are 36 X 22 cm so its a rectangle. But according to Joanne they still can be connected just like Fellowe's grids. So its up to you to see which you prefer & of course the cost involved.
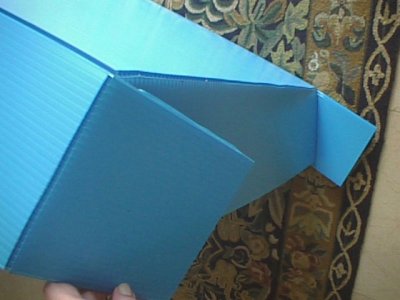
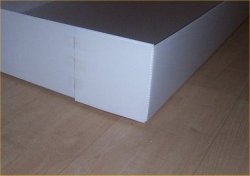
Besides cubes, the other item you need is Coroplast which is more commonly known as corrugated plastic boards. I'm sure some of you have seen Coroplast before just that you didn't know what its called. There's a pic of it below. The actual thing is a sheet but the one pictured below has already been partially bent to form the C & C cage's bottom. Coroplast should be available at art & craft shops. I spoke with Gek Kheng from Popular Bookshop & she tells me they sell it. However those available are too small so you have to contact Gek Kheng to tell her what size you want to order. I asked Gek Kheng the price for a 149.2 X 80.6 cm sheet & also a 115 X 80.6 cm sheet. She quoted me $14.40 for both sizes.
Cubes & Coroplast are the building material required for the cage but you will need some tools too. Pliers would be good in case some grids have difficulty connecting to the connectors. You also require a very sharp penknife for cutting the Coroplast to size. A one metre ruler would be useful 'cos I believe you'll have lots of difficulty struggling with a tiny 30 cm ruler! Have a measuring tape on hand too prefably one that goes up to 1 metre & beyond. Lastly, you'll need a water-soluble black ink marker.
What size
Choose a suitable place in the house for placing the cage & then see whether your desired cage size can actually fit. Each grid comes in standard size measuring approximately 34.3 X 34.3 cm. C & C cages are usually measured by the number of grids rather than the actual measurement. So instead of saying "My cage is 103 cm by 68.6 cm" for e.g. a C & C cage user will say "My cage is 3 by 2 grids". The approximate measurements for the more common cage sizes are as follows:
6 X 2 grid cage: 205.8 X 68.6 cm (L X W)
So as you can see, the size is quite flexible & if you have the space you can even create a gigantic 6 X 6 grid cage if you want. However I don't recommend the width of the cage be more than 2 grids 'cos the wider the cage is, the more difficult it is for you to reach in to grab your cavy, remove uneaten veggies, replace soiled bedding, etc. The 2 X 2 grid cage is already very small & I do not recommend building a cage smaller than it.
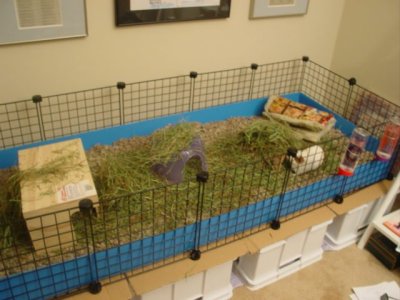
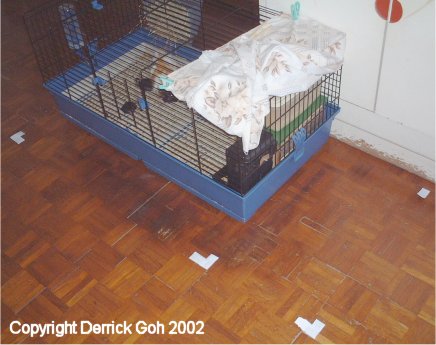
The pic below shows my current cage. The white stickers mark out the size of a 4 X 2 grid cage. As you can see, the 4 X 2 grid cage is significantly larger than my current cage, which BTW measures 118 X 58 X 52 cm.
After you figure out what size cage suits you, the next step is to know how many grids & connectors you need. Fellowe's Neat Idea Cubes has 17 grids & 20 connectors in each box. Below I have calculated the number of grids & connectors needed for the more common cage sizes:
6 X 2 grid cage: 16 grids & 32 connectors
One box of Neat Idea Cubes provides you with enough grids to make even the large 6 X 2 grid cage. However you may be short of connectors but these can be bought from Fellowe's distributor for $2 each. The number of grids & connectors given above are for the standard C & C cage. If you decide to make a cover for the top of the cage, you will need more.
With regards to the Coroplast (which is used to make the cage's bottom), you will need to know the measurements of your cage & then add 20 cm to the length & 20 cm to the width. Don't forget that you will need to bend the Coroplast to form the "walls" of the cage bottom. This additional 20 cm to the length & also the width will ensure you cage bottom has walls that are 10 cm high. I assume you use about 3 to 4 cm worth of bedding & if so, 10 cm walls are fine. But if you use more bedding then you have to increase the height of the walls. The approximate size of the Coroplast sheet required for the more common cage sizes are as follows:
6 X 2 grid cage: 225.8 X 88.6 cm (L X W)
Building the cage
The second step is to construct the bottom of the cage. If your Coroplast needs to be cut to size, use the water-soluble marker & ruler to mark out guide lines. I recommend water-soluble markers so that you can erase the line if you make a mistake. After you have confirmed the measurements, use the ruler & penknife to cut along the guide lines. After that, measure the Coroplast to ensure that it is the correct size. Since I'm making a 4 X 2 grid, my Coroplast should be 157.2 X 88.6 cm (L X W).
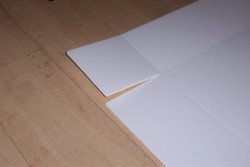
Next, use the ruler & marker to mark out dotted lines to indicate where you should be bending the Coroplast to form the cage bottom's walls. Simply measure 6 cm from each side of the Coroplast. The pic below is a sample. Once again I am demonstrating for a 4 X 2 grid cage here. If your cage is a different size, the steps are the same so just adjust the measurements.
Always double check to ensure the measurements are correct after marking out the dotted lines. Now use the ruler & penknife to score along the lines. When scoring, do not press too hard or else you will end up cutting right through it. In the pic above you will notice some dotted lines are red while others a black. The black dotted lines is where you will score along. The red dotted lines is where you will cut along. If you did that correctly, below is a pic of what one side would roughly look like.
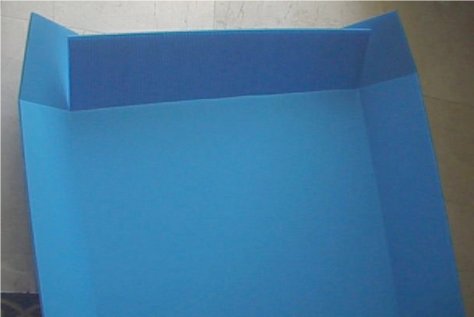
Once that has been done, bend the Coroplast away from the score line to make a box. Fold the long side in first then fold the 2 short flaps over it. The pic below is an e.g. of what I mean.
At each of the four corners there should be a flap which is loose & hanging there. Secure the flap to the box by using super glue. The flap should be secured like the pic below. Do not apply so much super glue that it overflows when you press the flap against the side of the box. You do not want your cavies licking it even if it is dried! After you have glued the four flaps to the box, let the box stand for at least one day to ensure the glue is dry & that the box is sturdy enough.
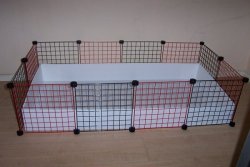
Put the box inside the "fence" you made earlier (as pictured below) & viola! You have made your first C & C cage. If your measurements were correct & your skills good enough, the box should fit snuggly into the "fence". If there's a bit of allowance it is okay. But if there's so much space in between the box & the "fence" that your cavy can crawl out of the box & into the "fence" then you obviously made a big boo boo! Such a cage can't possibly be used!
Conclusion
Remember that the C & C cage's bottom is no where as tough as that of a commercial cage. So don't even think of moving the cage with the cavies in it. I'm quite sure the bottom would give way at the corners! If your cavy always pees in the corner, you will realise that the cage bottom's corners are not watertight. To overcome this problem, try using scotch tape (not the puny type in your pencil box but those big ones for taping huge cardboard cartons) to tape the corners.
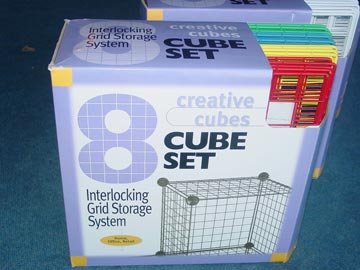
First thing you need is a Cube storage set. This is a general description of this item 'cos there is no "real" name for it. Some people call it "interlocking grid storage system" while others simply refer to it as "cubes" or "grids". Perhaps the pics below will give you a better idea of what I mean.
Now you need to decide on the size of the cage. The dimensions & information given here are based on Fellowe's grids which are 34.3 X 34.3 cm each. If you are using Yew Lee Metalwork's grids or some other brand, you might have to do some adjustments to the measurements.
5 X 2 grid cage: 171.5 X 68.6 cm
4 X 2 grid cage: 137.2 X 68.6 cm
3 X 2 grid cage: 103 X 68.6 cm
2 X 2 grid cage: 68.6 X 68.6 cm
5 X 2 grid cage: 14 grids & 28 connectors
4 X 2 grid cage: 12 grids & 24 connectors
3 X 2 grid cage: 10 grids & 20 connectors
2 X 2 grid cage: 8 grids & 16 connectors
5 X 2 grid cage: 191.5 X 88.6 cm
4 X 2 grid cage: 157.2 X 88.6 cm
3 X 2 grid cage: 123 X 88.6 cm
2 X 2 grid cage: 88.6 X 88.6 cm
Now we can finally start building the cage. In this example I will be building a 4 X 2 grid cage. If you're building another size, just adjust the measurements but the method is the same.
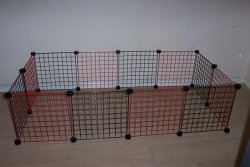
First let's start with the "fence". Connect the grids & connectors together to form a rectangular shaped "fence". Very straightforward! There's a pic of it below. If your's looks like it then congratulations, one part of the cage is now done.
You might find that your hay rack & water bottle may not fit the C & C cage that well. This is 'cos most accessories are designed for use with commercially designed cages & not DIY cages like the C & C cage. If the rack or bottle is too high for the cavies to reach, try putting something like a stone (make sure the surface is not rough), a brick or wooden block (sandpaper it to remove splinters) near or below the rack or bottle. Alternatively, you may want to look for a new rack & bottle which is of different size & may better fit the cage.